Monday, December 27, 2010

Buche de Noel!


This year I decided I wanted to do something a little different for Christmas dessert. Typically I'll do a couple of pies (pecan, pumpkin, sometimes banana meringue) but I wanted to get out of the rut.

I've been seeing a lot of lovely images of the traditional Buche de Noel, or the Yule Log, a French specialty.

I ended up using Martha Stewart's recipe: http://www.marthastewart.com/recipe/buche-de-noel (but I consulted many, many links, which gave me a nice understanding of how it's constructed).

I started out making the meringue mushrooms. They took a LOT longer to bake than I'd been lead to believe (I think I had them in there an extra 40 minutes), but they finally felt dry enough to be done.

Then my boys helped me assemble them. Below, Colin is skewering a hole in a cap. Then Ethan is spreading melted chocolate on the underside and a stem is inserted into the hole.


The tiny bit of cocoa powder Martha tells us to put in made them look pretty realistic and the imperfections in my meringue piping worked to my favor.

The last image, above, is of the cake batter, all beautifully whipped up.

After baking, it's rolled up in a damp dish towel and allowed to cool (you pre-roll it so that it's less likely to crack in the final roll-up).

Chocolate mousse is spread inside the cake and the whole thing is rolled up once again.


A couple of bits are sawed off at 45 degree angles and attached to the log (one really short stump looks cute on top).

The whole thing is assembled with a chocolate ganache icing that is raked with a fork to give it a rough bark-ey texture. It can be assembled the night before, however the final touches should only be added the day of presentation. (I also added graham cracker crumbs to give it a nice "ground" to rest on and a few sprigs off the Christmas tree, which added a nice touch of color). A few shards of broken chocolate add to the rustic bark appearance and a light dusting of powdered sugar give it the feeling of snow.

It was tasty also! The mousse filling really kept it from being too rich and heavy. Serve each slice with a meringue mushroom (the recipe made enough to cover a field of buches that I just kept handy for little boys to snack on).

I'm embarrassed to admit that I took far more photos of my buche de noel than I did of my kids opening presents (well at all on Christmas) and spent a lot of time inserting as many references to my creation as possible all day ("Oh, just move the buche de noel over there... anyone up for a little slice of buche de noel? What do you think? Just a splinter? Buche, buche, buche?"), but really, I was very pleased with how it turned out!

Tuesday, December 21, 2010

Spicy Glazed Pecans Gift: Free Download!


I made these super yummy glazed pecans as a gift for my coworkers and neighbors. They turned out so well that I'm sharing the recipe and including the label as a free download!

First of all, make a batch of these delicious (and super easy!) pecan from Martha Stewart:


Go to Martha Stewart for the recipe.

Below is a nice big double batch (all piled together -- you'll roast them in a single layer).


I packaged my pecans in cellophane bags that were 3.5" wide. 


Cut on the crop marks. Each label looks like this:

Fold in half. The back will be white, leaving a nice place for a personal message.

The cute snowman graphic is from here: http://www.vecteezy.com/Holiday-Seasonal/743-Free-Christmas-Themed-Sketchy-Vector-Graphics-Pack Free download! Love  the generous web! And it's a vector-based image, so I was able to easily lop off his arms, which didn't work with the design (sorry, snowman!).

Staple over the folded top of the filled bags (I put about a cup of nuts in each bag below).


A great little gift! Enjoy!

Wednesday, December 15, 2010

Christmas Riddler: A Holiday Papercraft!


Some people call them fortune tellers. Some knew them as cootie catchers. Whatever you called them, these fun little origami toys were a mainstay of my grade school days.

And now, they're a cute little holiday gift!

I've filled this version with groaningly bad Christmas-themed riddles. They're truly terrible, but they're kind of jokes that my little boys would hoot at. I'm going to make them for all the little neighborhood kids. Super economical and easy to boot!

The pdf is available to download and all the instructions are included below!

Download the pdf template now.


Print the pdf out on regular weight paper (not cardstock).

If you don't remember how to fold these from when you were a kid, it's surprisingly simple. Just follow along with the images below.

First cut the excess paper off the edges of the design, using the crop marks (the crop marks extend all the way to the edges of the paper -- I find it easier to use a paper cutter for trimming when I do this). Do this carefully! If you are precise this paper toy will work better! You should end up with a perfect square.

First, fold the square diagonally, corner to corner. Unfold. Then fold diagonally, corner to corner the OTHER way. Unfold. This will give you two creases that will clearly show the exact middle of the square.

Fold each corner to this middle point. Turn it over.


As before, carefully fold each corner to the middle of the square, as shown in the images below.

When you are done, fold the item in half, as shown in the middle image below (not diagonally). Unfold and fold in half the other way.


 Put your fingers in the hollows under the "Ho" corners. Work the creases so it looks like the last two images above. Flip it over and you're done!

Insert your thumbs and index fingers of both hands (not as shown below -- I had to hold the camera with one hand!) and alternately open the riddler first one way then the other.


Ask the child their age and open open the riddler that many times. Then ask the child one of the riddles that appear.

Get ready for fun!


Saturday, October 30, 2010

Skeleton Invitations

I love Halloween.

And I love Martha Stewart (I can't help it, she has such clever ideas).

Throw in some papercrafts and, well, I'm completely yours!

I love these skeleton invitations from Martha Stewart:


I downloaded the wonderful template and made some cute cards to share with the neighborhood kids:


I LOVE them! I love how you pull him out of a regular #10 envelope and he unfolds to an unexpectedly large, gangly size...

The boys just ran around the neighborhood delivering these... if you'd like to make your own, check out the page on Martha's site.

Monday, August 30, 2010

Tuesday, August 3, 2010

Customer Spotlight: Shannon


Constantine is Shannon's son and such a lucky kid! When she decided on a Knight theme for his birthday, she went all out!

See the photos she so kindly shared with me of the fabulous medieval party in the park she put together. Constantine's costume, cupcake toppers, bouncy castle... everything for a perfect party! Shannon made the felt swords and shields, tiaras, wands and painted the little wooden knights -- amazing!

My Knight invitations had been sent out before the party, setting the tone for the event:


And, afterward, guests received a personalized thank you note:


Fun!

Thanks for sharing your photos, Shannon!


Tuesday, July 27, 2010

Dragon Cards


Sometimes a biggish order can be a little overwhelming. I had an order of 60 custom dragon invitations to do.


The most tedious and exacting part of the project is cutting out all the pieces. Everything needs to be cut out just right, otherwise they don't pass muster and must be reprinted and recut.

The card stock has to be scored -- I love a nice, clean crease.

Below are all the pieces (finally!) all cut and ready for assembly (my favorite part of the process).


After that, everything goes together pretty quickly!

Monday, July 19, 2010

Community!


A few years ago, I gathered up contact information for all the neighbors (well, the ones I knew and liked) and put together a little directory.

Prior to that, there were people that I had chatted with for years whose last names I didn't even know (okay, I was even fuzzy on a lot of first names).

Thus was born the neighborhood directory!

The first edition was a great success and, I think, helped to bring some of us a little closer together. With email addresses at our fingertips, it was very easy to make plans for gatherings. I could call someone up if I was short a cup of sugar. The neighborhood teenager became easier to engage for date nights. Addresses helped us match names to faces.

So two years later, it was time for a new edition -- people had come and gone and our tight circle was expanding.


Of course, I can't show you the actual information -- that would be a bit of a violation! But on the real directories I included names, address, phone number, email address, cell numbers and names of kids and pets.


On the back, I included some handy local information as well as a little map of the neighborhood (the shaded areas are participating neighbors).


The "guts" with much of the information. I tried in vain to find a stapler with a long enough reach to staple these, but was never successful. Luckily I remembered my own tutorial about stab binding and my ginormous spool of gorgeous baker's twine. It was really easy and is so much cuter than staples!


On the backs I hot glued a magnet, making it handy to keep on the fridge.


It was a fun little mini project! The boys and I delivered them tonight and they were very well received!

Let the community-building begin!

Saturday, June 26, 2010

50th Wedding Anniversary Invitations just about done!


I am getting serious about finalizing the invitations for my in-law's 50th wedding anniversary. This is my current final, final draft, awaiting final tweaks and approval.

Guests will open the white square envelopes to see a photo of honeymoon-bound teenagers with the inscription: "John and Mary Lou. The First 50 Years." It's meant to look like a record sleeve.


Flip it over and they'll see a present-day photo of their entire brood (that's me in the middle in the red). Their "greatest hits" include the major milestones of their marriage disguised as song titles. For instance, "Double Wedding Bells ('98)" was the year two of their boys were married (one of them to me). 


To the right of their greatest hits is a traditionally laid out invitation.

People will notice that this is a sleeve in which is enclosed the record invitation.


It's meant to look like an old time 45 record album of their last big hit "Return to the Scene of the Crime." Since they have chosen to renew their vows at the same little church where it all began, they have been jokingly referring to the celebration as returning to the scene of the crime.

As you rotate the record, the red arrow points to "Who" "What" "Why" etc and information appears in the cut out window.


RSVP postcards are included in a complementary color scheme.


And, in lieu of gifts, the happy couple would prefer that people fill a book with happy memories and wishes from friends. A paper band gives instructions to people to write something special on the sheets and return them at the celebration (or mail them, if not attending). The sheets will be bound into a book.

Wednesday, June 16, 2010

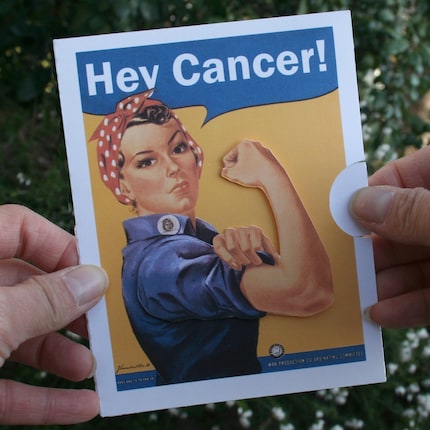
Hey Cancer Card Featured in MommyMishMash


Katy, of MommyMishMash, contacted me for three of my Cancer Cards

While I hate the idea that someone would need to place a quantity order of this particular card, I am glad that the empowering message can bring a little needed levity to someone in a tough situation.

Check out her blog, with a nice feature about the cards:


Thursday, June 3, 2010

Cowboy Invitations

Before I got a Craft Robo or even a handy ATG gun, I had an X-acto knife and a glue stick...


The boys wanted a cowboy-themed party for their fourth birthday and I contrived this somewhat over-elaborate invitation.

As you pulled the tab on the right, the bucking bronco and cowpoke rode across the desert. At the same time, information about the party was revealed on the tab.


In retrospect, it wasn't a bad invitation, really! The tab's a little stiff and could use some work, but it was pretty cute back then...


I got a kick out of finding old Lone Ranger comic art and substituting my own quotes in place of the Lone Ranger and Tonto's conversation for their thank you notes....

Friday, May 28, 2010

Hot Dog!

June's just around the corner and with summer coming, I can't help but want... a party! Tad's gamely letting us host a little barbecue/potluck next month, to bring the neighbors together. We'll also celebrate the boys' 10th birthday party.


We did the same thing last year -- a neighborhood food fest with a little "Happy Birthday" party in the middle. It was very low key and just felt right (as opposed to the big themed partyzilla with decorations, clowns, goody bags, etc. Okay, I'll admit, I have done the over-the-top parties myself, but as they are a little older now, it feels right to take it down a few notches)


The hot dogs were my nod to frugality this year -- we're in the beginnings of a major home renovation, so we're a little budget conscious right now. The important thing, I think, will be getting together our friends and neighbors and having a good time.


The invitations are a simple cutout, with the front piece pivoting away from the back on a brad.


The artwork was free.... I found it in a big book of clip art that I already own.

Does anything say summer like a hot dog in an envelope?


These bright yellow envelopes were leftover from a long ago firetruck-themed party invitation I did for some friends. The sunny hues just scream SUMMER!

Yay!


Tuesday, May 25, 2010

Mmmmm.... yummy twine!


Have you, like me, been seeing baker's twine EVERYWHERE?

Sure it's divine and oh-so-yummy, but what's the deal? It's just string, right? And the prices that I'm seeing for it just seem outrageous ($10 for 100 yards? $.30 a YARD???) Forget it!

Then I found the deal of a lifetime (and by lifetime, I mean I'll be using this spool for an entire lifetime!) at $9 for 3,200 yards!

CRAZY!

Of course, you have to spend almost that again for shipping, but still...

Get your own at: http://www.wesellcoffee.com/page79.html

I plan to use this on EVERYTHING. I started with some new packaging for my card packages.

Check it out:


I like the cheerful red and white twine against the natural brown tissue paper.


What do you think?


Posted by Picasa