Wednesday, December 31, 2008

Year of the Ox Card


I made a sweet angel card from a template from Keiko Nakazawa's wonderful 3D Pop-up Greeting Cards book that I got for Christmas (also, by the way, I apologize for the smugness of my Chrismas post -- I hadn't meant to sound so obnoxious but I was just so pleased that day!)


I used the principals I learned from making that angel card to create the above card, celebrating the upcoming Year of the Ox, Chinese New Year. I found a really beautiful ox illustration on istockphoto.com:

Click on thumbnail to zoom in.
It was perfect for what I wanted because it is standing on two legs on a nice, straight level surface.

Plus the artist was kind enough to include the chinese symbols for luck (I think), which I also used on the card.

My initial design included the ox in all its color glory, but eventually I decided that the profile of the ox looked more dramatic in pure, simple white against the deep red of the card.

I was going to post this card for sale on etsy, but the photos I took today didn't do it justice.

On other papercrafting news, I recently ordered envelopes from http://www.envelopemall.com/. They have a variety of envelopes in various sizes and colors at quite reasonable prices. While I have to buy 100 at a time, as opposed to 25 from Paper Zone, a local store, the cost is less than half (though I do have to spring for shipping as well). In any case, I have been pleased with how quickly they got my order into the mail and was so happy with the 400 5" square envelopes I received that I immediately put in another order for envelopes of other sizes and colors.

Tuesday, December 30, 2008

Jungle Invitation: completed!


Remember this jungle invitation that I was tinkering with? It's done!

After a lot of playing around, I finalized the version on the left and posted a listing for jungle invitations on etsy.

This is the first invitation I've posted that I hadn't designed for a party for the boys, but the idea of a jungle party just seems like so much fun.

Some ideas:
  • A fun game that works very well at parties when there are children of very different ages present is a search game (for the boys' second birthday party, which had a bug theme, I scattered a gross of foam bugs in the yard and they had such a blast finding them that they begged us to hide them again for them).

    For a jungle animal theme, I would suggest scattering plastic animals and sending the children on "safari" to collect as many as they can find.

  • Face-painting is always a popular activity. Try tiger stripe faces, if you have the time and the talent.

  • Cut out animal "paw prints" and use them to lead your party guests from your sidewalk up to your door.

  • Family Fun always has a bunch of great birthday party ideas. Check out their "It's a Jungle Celebration," with some clever cake ideas, activities, decorations and craft ideas.

  • If you are going to serve lunch, I've made this snake sandwich by Paula Deen before and it was a terrific hit: http://www.foodnetwork.com/recipes/paula-deen/snake-bites-recipe/index.html

  • Older children may enjoy playing "Who am I?" Tape the name of an animal to each guest. Each are allowed to ask other party-goers yes or no questions until they figure out what they are.

  • Pin the tail on the tiger/monkey/zebra or whatever other animal can be especially fun for younger kids.

  • Another fun activity for younger kids can be "Duck, Duck, Hippo" -- most pre-schoolers already know the rules.

  • Guests can be transformed into jungle animals with inexpensive foam animal masks (these are from Oriental Trading -- I've ordered these and they were a good deal).

  • Animal charades can be a fun activity. The kids can act out various animals or try to imitate their sounds for small prizes.

  • Dress the birthday child in safari clothes and invite guests to do likewise. Purchase pith helmets for guests to wear.
Do you have other ideas? Please feel free to tell me about them!

Thursday, December 25, 2008

Quotes that Don't Apply to Me and a Papercrafting Book Review


My boss is fond of quoting his daughter at times when things aren't going right: "Sucks to be you." (he's actually not as awful as that quote makes him sound (and, in fact, he is likely to be reading this RIGHT NOW. Hi, Dave!))

Another quote, this time by the great band, Everything but the Girl: "Every day's like Christmas day without you; it's cold and there's nothing to do."

Okay, neither of those quotes apply to me right now because currently, on this beautiful, white Christmas day, it doesn't suck to be me. 

Let me explain (and I hope that I don't sound too terribly obnoxiously self-satisfied. I assure you, I'm not like this all the time).

Despite losing a houseful of guests, our extended family, who were due to come in and help us celebrate the holiday, sharing the 18lb. turkey that had been lying in wait in our fridge for today, things came out okay. And, as we told the boys, one nice thing was that we now get TWO Christmases, as we will celebrate again after the snow that has had us housebound for many a day finally thaws out.

I got some lovely gifts, one of which I need to share on this blog: 3D Pop Up Greeting Cards

This book is by Keiko Nakazawa and it is wonderful. She does some very intricate and beautiful things with pop-ups.

One of the reasons why I was walking around with a very contented feeling was because the book, combined with some toys that I already have, make me feel amazingly powerful.

I feel like I'm on top of the (paper-crafting) world.

I have a Craft Robo, a digital cutting device. I have Adobe Illustrator and Photoshop, fantastic programs with which I can manipulate illustrations to design cards (or anything!) and which interfaces with my Craft Robo.

With books like Keiko's, I have a ton of wonderful inspiration to springboard my imaginations.

The book includes color photos of her pop-up cards as well as instructions and templates.

I can scan the templates, clean up the image in Photoshop, bring the file into Illustrator which has a nifty autotrace feature (which allows me to create vector lines that the Craft Robo can understand so that I can tell it what to cut for me), further refine the image and then send it to be cut by the Craft Robo.

It can take a little bit of fiddling to get a scanned image completely tidy, but once I have a working file, I can then cut it many, many times.

So, while it took perhaps 30 minutes to get Keiko's charming dog pop-up card set up correctly, now that it's done, I can cut one out in minutes any time I want:


There are dozens of other really lovely creations in this book, which I recommend to anyone wanting to understand pop-ups more thoroughly. Her ideas are quite clever and you can learn a lot by careful examination of her techniques.

Tuesday, December 23, 2008

Jungle invitation

I woke up this morning at 4am, unable to sleep, so I got up and started doing some work on some new invitations.

I'd been wanting to do some variations of my fishy invitations, which are a fun design that are really easy for me to mass produce, once all the customizations are done.

For me, often the biggest hurdle is finding good artwork. I'm not an illustrator and have to rely on finding artwork that suits me. A really great resource is http://www.istockphoto.com/ which has thousands of great images that they sell for next to nothing.

I use Adobe Illustrator to design my cards in and generally am looking for nice illustrations (vector-based artwork -- drawings as opposed to photographs). Images in this type of format allow for easy manipulation (resizing, splitting apart, recoloring, etc).

This morning, I lucked out and found a series of adorable jungle animals that I could easily adapt to the wheel invitation design. Some cute jungle foliage artwork worked well to make the background look interesting. Shown is an early draft. I'm not done fiddling around with it yet, but I wanted to share what I had so far. Hopefully I'll be able to finish this up and post it on etsy in the next week or so!

Just wanted to share this sneak preview...

Monday, December 15, 2008

Paper Engineering Books I Love


 Last night, we headed over to walk down Peacock Lane to see the holiday lights (a Portland tradition) with a family I didn't know. The dad went to college with Tad. Since they had one boy the same age as our twins, it seemed like a good idea to get to know each other.

I knew they'd be nice enough, but in the course of chatting, the mom mentioned how she'd been making pop-up cards.

Zing!

I was instantly interested and begged to see her work.

Now, often, when people do crafts, there's a WIDE range of quality and creativity, so I was quite pleased to see some very clever little mechanisms involved with her cards. As we talked excitedly (and Tad murmurred something about the wives being "separated at birth") we found that we could discuss people and techniques with each other that would bore others silly (and, indeed, we had to keep stopping as we realized that we were monopolizing conversation in talking about Robert Sabuda's work, brads, angles for pop-ups, etc).

We've started to correspond. I think I've gotten her quite interested in my beautiful and faithful Craft Robo (and in talking with her, I've fallen in love all over with it) and we've promised each other a "play date" in which she could come over and see how it works. (all of her work is cut out by hand. She did pop-ups for her holiday card one year, which I find amazingly ambitious! I can't contemplate doing the same myself even with the luxury of automation!)

I wanted to share some of my favorite books about interactive cards with her and so I created this list on Amazon: Must-Have Books for the Interactive Card Designer.

Enjoy!

Thursday, November 20, 2008

Etsy Nibble!


The original point of this blog was to support my etsy store. Over the past few months, I've lost a little of the obsession of using my beautiful little Craft Robo, quite possibly my most fun and exciting craft purchase ever (and one whose cost I justified by pointing out the thousands I was going to make on etsy).

I've had a bit of a dry spell on etsy for a few months. You get sales by keeping your store up-to-date (newer postings come up first in the search results) and by actively promoting your store in ways that I haven't been taking advantage of lately (one is by blogging about your various activities), so it's something of a miracle that someone actually did stumble upon one of my listings, for my circus/carnival invitations and asked about them.

She's planning a "Three-Ring Circus" theme for her three kids. In the works: a music instructor to entertain the wee ones, a popcorn machine, a bouncy structure, clown performance and other fun activities.

Fun! I love people who plan in advance (it makes my own obsessive planning six months ahead of time seem a little less crazy).

Hopefully she'll respond positively to my message back to her.... we'll see!

Saturday, September 13, 2008

Polka Dot Birthday Party Invitations: DONE!

Remember this invitation? The mom contacted me late spring for the party that would take place in October. A mom after my own heart!

(there were some years that I started planning the boys' birthday party in January, locking in the theme, planning the invitations, looking for cake decorating ideas, etc)

The party would have a polka dot theme. She contacted me because she liked the other invitation I'd done and invited me to design something new.

It took many months and a lot of different comps and color variations, but we finally arrived at something that both of us were happy with.

The invitations shipped out early this month and, despite the post taking longer than the post office guy told me it would (and causing both of us some heartburn -- I was convinced that I would have to spend an entire weekend recreating them only to get an email telling me that they'd been received, which I hadn't been looking forward to).

As per my rule of including "extras" with every order, I added in two additional invitations, five additional envelopes and a set of coordinating round 2" stickers (to decorate the envelopes with).

These kinds of extras don't take me much extra time to do or add in, but I know, if I were the consumer these kinds of bonuses would make me very happy.

So, happy ending!

Look for a generic version of the polka dot invitations on my etsy site soon!

Monday, July 7, 2008

Pirate Card Ahoy!


I don't know about other places, but pirates are big, really big, here in Portland, Oregon. We are the proud home of Captain Bogg and Salty, possibly the best pirate band ever.

We host the annual Portland Pirate Festival, which gave me complete sticker shock the first time we went and purchased tickets ($18 for each adult, at the time), but afterward, we decided that it was well worth it (so many items are free once you enter -- the kids can bounce through numerous inflatable kids bouncy slides, houses and obstacle courses at the Scupper Monkey Island (aka kid's corner), we got to see numerous shows (not least of whom, Captain Bogg and Salty, but also including a wonderful pirate parrot show, puppets shows and the like), we witnessed a sailing ship firing cannons upon pirates on the shore, watched numerous sword fights and played loads of fun kids games hosted by very authentically-dressed buccaneers.

Every time that we've attended, the boys were given some very cool pieces of eight (they seemed to be real metal, not pieces of cheap plastic) by a kindly old sea dog. They've also been given balloon animals, plastic pirate hats and other assorted booty, just for being there.

There seem to be numerous pirate-themed retails shops popping up here and there in the malls. You know when a trend hits the mall, it's definitely mainstream. One might argue that the trend has definitely jumped the shark at this point, but the pirates elsewhere are simply too darned cool for that.


Above are various pix of a pirate birthday party invitation that I have in process. I'm not nearly done yet, I'm just past the stage when I've made sure that all the moving parts work as expected.
The front of the card still needs a little....something, I don't know what (maybe some text announcing that there's a pirate party in the offing). And the back is just crying out for something more, like a sign for the text to hang on, or a pirate ship in the background or something.
But I'm happy with it so far.
I'm taking a few days off of work next week to post this and my generic polka dot party card that I've been working on for ages. Can't wait!
Oh, I got an inquiry this morning about the Circus Party invitations. The woman asked if they could be revised to a carnival theme, which of course is pretty simple. She asked for a quote. The invitations are $40 for the first 10 and $3 each for each additional one. She needs 25 all together. I hope that she doesn't find the total ($85) to be too shocking, but these invitations do require quite a bit of handiwork for each one....

Wednesday, June 25, 2008

Another Fishy Invitation Sale!


I sold another set of Fishy Invitations! I'm printing them up tonight. Terrific customer -- she got me the copy exactly as she wanted it and approved the comp for me right away without a lot of back and forth. I'll be able to get these out in record time!

Silhouette Thank You Notes: The Final Chapter

Okay, a short list of what went wrong: went to Kinkos when they were closed (I thought they were all open 24/7), Kinkos guy added too many cuts, other Kinkos guy cut cards so they weren't square, had the wrong envelopes, returned envelopes to paper store when they were closed, ran out of ink (several times) and several other minor disasters.

What made it totally worth it was getting this email from my customer, "I got the invitations yesterday!!!! They are awesome; you did a great job. Thanks for the extras and the fronts of the cards (from the mishap) - I will definitely put them all to use some way... we are all good!"

So very happy!

Sunday, June 22, 2008

Silhouette Thank You Cards: Done!

So, after the tragedy of the thank you cards inadvertently turned into postcards, I returned home and reprinted the entire 125 set of cards. The next day, I returned to Kinkos hoping that they would "make things right."

A different clerk took my stack and after hearing me repeat several times that these were cards that folded (and were not postcards) and seeing the comp that I have created as a visual reference, took them away. When he returned, somehow, he had cut them so that they were not square -- when you folded the card, the back was quite obviously much wider than the front of the card, which was not at all a pleasant effect.

It seems really peculiar to me that the cutting machine wouldn't automatically default so that it would cut items on the square, that is, either perpendicular or parallel to a given side. But I don't really know how things work there, so I can't really try to guess what went wrong.

Finally, he got things cut so that the front met the back the way I thought that they should.

Meanwhile, the manager came over and apologized for the problems the previous night and offered to pay for three of my toner cartridges and a ream of the card stock I had used, which seemed quite fair to me (I used probably about exactly half of both of those for this project, so I was partially compensated for my time).

I actually saw the young man (slacker looking teenager with huge glossy black bushy sideburns) who made the fatal cut. He came over and apologized again for his mistake. I let him know how much I appreciated that (I really did). Mistakes happen and when someone has the integrity to own up to it, it makes all the difference in the world to me.

Okay, so they made everything right and you would think that I'm out of the woods, right?

I was babysitting for the neighbors on Friday night (my neighbor, Tricia, and I have a reciprocal arrangement that really works out wonderfully for our two families) and I planned to do all my folding after I got Grace to bed.

As soon as I started to fold the cards, I realized that things were still wrong. Horribly, horribly wrong. While the cards did, indeed, get cut so that all the sides were squared with each other, THEY WEREN'T SQUARE WITH THE ACTUAL CARD ITSELF.
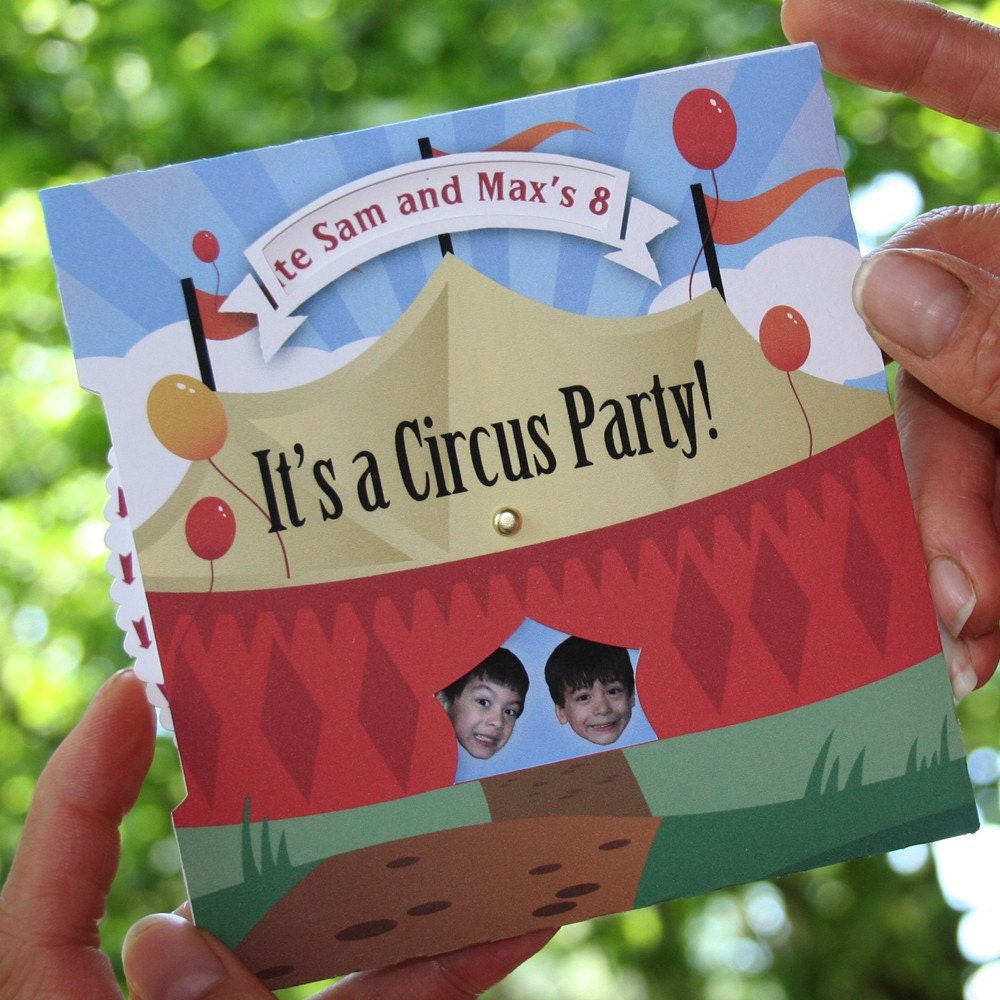
See image.

At first I thought I could compensate by folding it so that the front was a little shorter than the back, but the problem was simply too severe and it didn't look right and I knew that the only right thing to do would be to reprint the entire set of cards one more time.

This time in order to make things almost foolproof, I added quite a bit of "bleed" all around the print. This is additional print area and it compensates for poor registration. When I cut items myself, I don't need much bleed as I can cut things exactly where I want the cut. In the case of something like this, it is possible/probable that there is some shift in how the image is positioned on the page because of the printer.

I also printed out a special guide sheet for the Kinkos guy so that it would be very apparent where I need the cut to go -- I made the lines very bright pink. If the machinery doesn't automatically create "square" cuts, then the lines should show him where the cuts go. Also, when you begin to cut pieces off, you'll naturally be cutting off your crop marks if you make the traditional type, without a guide like this. The Kinkos guy seemed to appreciate the guide sheet. I actually gave him two guide sheets and told him to split the stack into two, in case the number of sheets I was asking to print at one time was an issue.


I went to a different Kinkos this time and explained the situation to the guy. (I'm sure that if I went back to the original one, they would have made things right for me, but I just didn't want to have to tell them that things were messed up again -- they really were so nice about it the first time) He took a ruler and measured all around my piece to make sure that my piece was positioned square on the page (which would certainly have been a problem for the first two Kinkos employees if they were not). I told him that I'd added quite a bit of additonal bleed all around and, again, this seemed to be appreciated.

He was sympathetic about the issues I'd encountered already and I surrendered my stack of printouts to him with a little tiny prayer.

Anyway, long story short (too late, eh?), he cut them perfectly. Everything was square, the cards folded correctly and all looked great. He affirmed that I'd done everything correctly.

And, finally, on Saturday afternoon, after just about every mishap you can imagine, the cards finally got sent out. I used the half of the cards that had little printing on them as slip sheets (there's so much ink coverage on the piece that the black can rub off if pressed against something), so at least I put those cards to good use. I included the fronts of the cards in my package in case my customer could use them as postcards or whatnot.

Hopefully the cards will please my customer!

Thursday, June 19, 2008

A Tragedy at Kinkos


I almost burst into tears at Kinkos today.


My customer and I finalized her turquoise wedding thank you notes, payment was all taken care of and I spent my entire evening printing out her cards, 125 of them, on both sides.


I used my new printer, all went quite well. No mishaps with upside-down printing. No jam ups, all went fine. We even watched a movie (Dan in Real Life, which I enjoyed more than I thought I would -- I really love Steve Carrell) while this was happening with me popping up occasionally to feed the thing extra cardstock.


When they were completed, I decided to make a dash to Kinkos on the spot to get them cut (at a dollar a cut, I'd rather let them use their machine than have me wear out my exacto knife (and right hand) on 125 x 4 cuts for all those invites).


The young man who helped me gave me an extra cut for free -- cutting my 125 lovely cards right in half!


Oh, it was tragic!


The manager came right over to try to smooth things out, but obviously, they could not really reimburse me for my time or my lost evening. He did offer to reprint the pieces at his cost on their own paper, but I wouldn't have been happy with the quality of the laser printer (with a slight gloss and faint lines streaking throughout), so decided to run back home and reprint them.


He has offered to reimburse for my paper and, partly, for some of my inkjet cartridges and asked that I bring in a receipt for that. Luckily, I have been saving these as business expenses.


Anyway, the young man who was helping and made the inadvertent error looked so very contrite and seemed since in his "I'm really sorry" that I assured him that "accidents happen" (but I was still so upset I couldn't quite look him in the eye).


So, the reprint is going on right now! I'm sure that I've had some extra practice in this already and it will likely go quite well.


Okay, I feel a lot better already for writing about this.


Phew!


I'll still get these cards out by the weekend. These 125 cards are my biggest order to date and I'm so very pleased with how they came out!


And, sometime very soon in the future, I'm sure I'll be able to look back and laugh at this silly little mishap!

Wednesday, June 18, 2008

Custom Wedding Thank You Cards

I bid on an Alchemy listing on etsy a while ago. Alchemy is where people can make custom requests for items (like they want an apron in a particular color/style or a doggie tag with their dog's name on it) and people make offers on it. It's pretty interesting.

Anyway, the listing was for custom wedding thank you notes. She had specified a "whimsical" look and a love of Dr. Seuss (she included a quote).

Getting some rough ideas out was super easy. I pulled a number of comp images from iStockphoto and sent them to her.

Here are some of the samples (all these images may be purchased from iStockphoto, btw, which is an awesome service):


The one that I almost didn't include ended up being the one that spoke to her.

That was this one:


Long story short, she accepted my bid and this is the current comp (we're trying to hone in on her particular shade of blue that she used for her dress and trying a few other variations). We added the quote, flipped the laptop so that the man was viewing it and added her cat to the picture, to complete the family unit.


Tuesday, June 17, 2008

Dottiness, Approved!

She liked it! I think my dotty party invitation will be a hit! My customer liked the concept and had some input on some modifications. This is what it looks like now.

We tried some different colors and she wanted to use a cute font that she'd used before. Also, we put in stripes, inspired by her daughter's bedding. It's fun to do something totally customized for someone.

Here's the piece when it's all opened up:


Lots of fun... I like the new brighter colors.

In any case, I think we're pretty close to the final product, just some minor tweaking now (she asked for thinner stripes, for instance).

Great fun! I can't wait to post a generic version of this polka dot theme invitation on etsy... I've seen so many wonderful ideas for this type of party online, including some cute ideas from Martha Stewart.

Saturday, June 14, 2008

A Dotty Party Invitation

Here's a rough idea for someone who contacted me for a card to make for their daughter's first birthday party, a polka-dot-themed occasion.

The draft below is quite rough, but you can get a general idea for where I'm headed with it.


The card begins with a circle. You can see concentric circles die cut in the front, creating more circles.
The first circle swings away to reveal another message for the receiver.

The second panel swings away as well to show the last message, with the details about the party and rsvp information.
This was mocked up quite quickly (once I had a concept, it came together like lightning) and, in order to get some pix to show my potential customer, I had my neighbor girl stand in as an unpaid hand model (hence the dirty fingernails). Also, I really need to work on finalizing the artwork -- I'm not at all happy with the initial panel...

If the mom likes this concept (keep your fingers crossed!), then I'll finalize it for her and, later on will post a genericized version on my etsy site for sale. The idea of polka dots for a first birthday party is totally darling and opens up lots of fun ideas for the cake, decorations and games (if some of the guests are big enough to enjoy them).

Friday, June 6, 2008

A Sale!

I began posting items on etsy a month or two ago and have made a few minor sales that don't count as they were to a friend who took pity on my humble non-sale status (she meanwhile, is getting requests to do wholesale baby bootie orders and has been reviewed quite favorably on cool baby goods websites along with people who've appeared on Martha Stewart).

Earlier this week, someone convo'd me asking me about my fish invitations! Within a few days, we'd sealed the deal for twenty invitations, approved comps and today, I shipped them off with a kiss for good luck via priority mail at the post office. She should get them on Monday, well in time for her daughter's summer splash party towards the end of the month.

In between, I suffered major trauma when the printer suddenly broke down completely at an inopportune time, but despite setbacks, it was still manageable and I think I am making more than minimum wage and having fun with it all, so that is all positive.

Hooray! With this sale, as I told a coworker, I've lost my amateur status and am now a professional card designer!

Brand new printer, partially financed with my etsy sale, will be arriving next week!


Check out my friend Wendy's wonderful baby booties and gifts -- they're so adorable that they make my teeth ache... and she has been very encouraging to me.

Sunday, June 1, 2008

Best circus party ever

Well, in retrospect, the theme really should have been a carnival party, rather than a circus party, as any elephants, tigers, trapeze artists and other big-top attractions were sorely lacking, however, the carnie atmosphere permeated everthing.

Guests were greeted at the door and given a paper bracelet that read "Admit one • All games" on it. Tad's parents then offered them a balloon animal (they had practiced creating hats, swords and a basic animal shape -- they were quite good), then they were shown into the back yard to begin the fun.

(bracelet as shown on young party guest's wrist as she plays the duck lasso game)


I showed them their goodie bags, each marked with their names. I told them that this party was not one where they would simply be given goodie bags at the end, but that they would have to earn their prizes. As they did, they had a ready spot to stash their loot.

We had five games that the kids played to earn tickets with which to "purchase" prizes:


  • Ring Toss (shown below), a lawn game that I picked up at Freddie's for 40% off. They got four tries and were given that many tickets.
  • Duck Lasso, with floating ducks that kids tried to lasso out of a galvanized metal tub. When they got a duck, they turned that duck over to find a number (1 to 3) and were given that number of tickets.
  • Clown Dunk. I hung a laminated clown face in a tipped over wastebasket and invited kids to try to bean him with a collection of water balloons that I'd spent party of the morning filling up.
  • Go Fish. This was a magnetic fishing game I got for the boys at Target many years ago and which they never really played with much. My carnie counted to 30 while the children tried to get as many of the fish as they could.
  • Bottle Splash. Party goers tried to knock over number of plastic drink bottles with super soakers.


One last game was the Candy Count. Kids could guess the number of pieces of candy in a jar. The guesses were written on tickets, so they could have multiple guesses, if they wanted.

I was very gratified to see how quickly the kids dived into the games and really got into the spirit of things. Of course, the big reason why they got jazzed so quickly over the games was that the tickets they earned could be redeemed for candy and toys at the concession stand, below.


My husband, Tad, manned the concession stand. You can see him spinning the cotton candy above (note: cotton candy does not keep well if you spin it and let it sit -- it attracts moisture and dissolves! You can save it in ziplock baggies, if you need to). Over the last few weeks, I picked up little things I thought kids would be interested in wherever I could find them cheap. Century Novelty was a good find. I got foam glider kits, body glitter, squirt guns, clown noses and other little things from them. At other spots, I picked up lip gloss, puzzle sets and a bunch of assorted candy. Some sparkley headbands with mylar flowers and technicolor feathers were a huge hit with the girls. Tad found some great party favors at Target and brought home wooden snakes and whoopie cushions. I sorted things into various baskets and marked them with tags that let the guests know how many tickets would be needed to redeem each item. Small pieces of candy were worth one ticket. The foam gliders and lip gloss were relatively luxurious and worth five tickets each.

Once kids got the idea, they dove into each game enthusiastically, quickly filling up their goodie bags (below).


A lot of the fun of the games goes to my enthusiastic "carnies," who are known, in their other lives, as the kids' grandma, grandpa, Uncle Johnny and godmother Sarah. They were great and kept the kids going from one fun activity to another.


My boys, above, are looking over the concession stand. Later in the party, the kids would virtually wipe it out (which was good -- I didn't need the sugary leftovers in the house afterward!).

I polled several of the kids after the party and even the most jaded of them pronounced the party a great success!

Thank goodness it's over for another year, though. And what a relief! I love the backyard birthday party (last year the boys had voted for a bowling party, which was not nearly as much fun for me to plan) and am soooo glad that this one was so successful!


Saturday, May 24, 2008

Circus/Carnival theme birthday party invitations


Here are the invitations I designed for my boys' birthday party, which is coming up next Saturday.

You spin the wheel on the left and as you do, a message about the upcoming party scrolls across the top while, cute images, including the faces of the boys (who are actually Colin and Ethan, but I changed the names for my etsy listing), circus animals and tasty treats, appear through the tent opening underneath.

For the party, I'll have carnival-type games, like a shooting gallery, a ring toss and something involving floating ducks (still have to work out exactly what happens with the ducks). My mother-in-law has gamely agreed to attempt to make balloon animals for the kids when they come in the door.


As kids play the games, they will earn tickets that they can redeem for concessions, which will include cotton candy (I picked up a cotton candy maker from Goodwill some months ago) and popcorn.

Fun little toys will be packed in popcorn bags for goody bags -- kids will "fish" for their goody bags.

In the past, I have used Oriental Trading (OTC) for the toys. This year, I decided to give their competition a try and have ordered a variety of toys from Century Novelty (there have been times when some of the items from Oriental Trading have been less than spectacular -- pretty much as described, however, I didn't read the print clearly enough and some items were disapppointingly tiny for instance (and, once, a set of paper kaleidescopes simply didn't work at all) -- they have a return policy, but I haven't taken advantage of it, so it's possible that they would have, in the end, made everything all right -- I just didn't have the time to deal with it in past years)

So, long story short, we'll see how their competition fares. One nice thing about Century Novelty is that you can order items by whatever quantity you wish, but at OTC, you must purchase by a set quantity (12, 8, 144, typically). This gave me more flexibility. We will only have nine guests and this will eliminate some waste. Also, among other toys, the boys will receive squirt guns and gliders and the girls will get body glitter and lip balm/gloss (which I'll purchase at a local store).

Other items in the goody bags: red foam clown noses, 3d tropical fish puzzles and candy (purchased from the dollar tree locally).


This card is on sale at my store on etsy: http://www.etsy.com/view_listing.php?listing_id=25788953 -- take a look!

Other circus party ideas (some of them quite elaborate!) can be found here.

And please leave comments -- I'd love to hear some feedback. If you have ideas for games, activities or other party-related topics, let me know! (particularly if you have them before this Saturday -- I'm getting close to crunch time!)

Wednesday, May 21, 2008

A Fishy Party

As I mentioned in my previous post, the boys' third birthday party revolved around a fish theme. Above, you can see Colin on the left and Ethan on the right behind the first of their two birthday cakes (I have it on very good authority from an identical twin (who happens to be their godmother, Sarah) that it is de rigeur to have a cake for each child, even if they are so lucky to have a twin sibling).
The cakes were frosted with tinted buttercream and seaweed was piped onto the sides of the cake with a leaf tip. Crushed graham crackers stood in for the sandy sea bottom. The decorations were made of melted meltaways -- they're like white chocolate discs that you can melt in the microwave and then tint with candy food-coloring (you can't use regular food coloring). Then you can pipe shapes onto wax paper, which quickly cool into candy confections. I got this technique from a wonderful book called "The Whimsical Bakehouse: Fun-to-Make Cakes that Taste as Good as They Look!"
The decorations were great as I could make them far in advance and only have to worry about doing minor things to the cake the day of the party.
One of the games we had was fishing, of course. I got a ton of little foam fish from a party supply place and hot-glued washers on the backs. I got some bamboo from a friend for fishing poles, had my husband cut them down to size and drilled holes in one end for string and a magnet. The children were given little buckets and fishing poles and sent out to the backyard to go fishing, where fish galore lurked all over the yard. The smaller children got poles with shorter strings which made it easier to catch the fish.
Crepe paper streamers hung down from the ceiling to simulate the ocean and seaweed.
Since the boys' party, I've reused this basic invitation twice for friends' parties. One had a Finding Nemo theme and the other was a pool party. In all of these instances, the invitations were a huge hit and really helped set the stage for the entire party.
Have other ideas? Please comment! I'd love to hear from you!

Tuesday, May 20, 2008

Brave New World


Well, my friend, Wendy, has been doing this, so why not me? Of course, Wendy, while working full-time, spends all her evenings making baby booties for her etsy site, sending me email when she makes a sale (which seems quite often lately) and blogging on her own blog about baby booties.

So, I think: Why not me?

Following in her footsteps (and in our friend Kathy's, who has been selling her jewelry and crafts on the weekend market circuit for years now and is currently working on creating a lavender farm and festival at her place in Vernonia (which is fun to say for any reason: VERNONIA!)) I have ventured into the craft biz.

I've been making invitations for many, many years now. Only since having my kids, though, and having an excuse to spend exorbitant amounts of time on such a frivolous activity have I made my invitations interactive. The first really good one was for their second birthday, a fish-themed party. I made a card that featured fish swimming around, using one of those little brass brads that you used in first grade to make jointed figures.

Ah.... I loved those days!

But I digress.

Since that third birthday, I've been hooked. I got tons of rave reviews about the invitations from the various parents (the children didn't seem to care, of course). That same fish invitation was recycled a couple of times for other kids' parties -- once for a Finding Nemo birthday and once for a pool party.

Years later, I've posted the fish invitations for sale on my etsy site: http://www.etsy.com/shop.php?user_id=5033209

Check them out!