Tuesday, June 30, 2009

Rolled Scallop Rose Tutorial

Check out this pretty paper rose. It's easier to make than you'd think, just read up on the tutorial at the Inspirational Tips, Techniques and Tutorials Blog!

Saturday, June 27, 2009

New Superhero Card

Finally! A new card in my store -- I haven't added anything since I posted things for Father's Day (I've been totally distracted by my Crafty Space Makeover Challenge).

My other superhero card has been popular, so I think this one will do well as well....

Friday, June 26, 2009

Customer Spotlight: Love from Singapore 2


More photos from Nicolette, our flea market friend in Singapore (read about her in this previous blog posting)

I was excited to see two of my Three Reasons cards at the top of the yellow display that her friend made for her (top middle photo). Yay!

Here's what she says:

As you can see, I put both your cards on the yellow stand, and I swearrrr at least 10 people asked me how that worked!! It was really cool, and I was so happy! Didn't manage to get a decent shot of the crowd cuz once they started coming, I was swamped!!! The last picture is a picture of my friend & I (right). She follows me to all my fleas and helps control my spending!! Even then, I'm often way over my budget. I will always remember how nice you were to give me such a good price for the cards!! :)

We were so busy we didn't even have time to eat! At around 3 or 4 in the afternoon more friends came (thankfully!) and helped us to take over so we could fill our tummies (no food since the night before!! Busy preparing, haha!) and for a toilet break. Friends are awesome sometimes aren't they!

I'm really excited for the one this coming weekend! It's supposed to be really big & I really can't wait! Will let you know how that goes Molly! :)

So there you have it! I am now a global card manufacturer! Thanks for the update, Nicolette!

Wednesday, June 24, 2009

Let There Be Light!


The first photo at the top shows my before shot and the second is the current, after, shot. It's still a work in progress, but I feel like I'm miles ahead of where I was already!

My big bugbear has always been clutter. If there's junk all over the desk, then I'm unlikely to feel motivated to clean things off before I craft, so messiness is a big barrier to creativity for me.

Another problem about my nook is how dark it used to be. I think that's one of the reasons why being able to pick up my essentials and craft downstairs, at the dining room table, is so much more appealing to me: more light!

In the first image, for before, the main source of light was a little lamp. It was cute, but the problem was that we had an energy-efficient bulb in it -- the kind that corkscrews. As a result, the cute shade was always askew.

The other problem with the lamp was that it is the kind of lamp that has the on/off switch on the cord, so I was always having to find the switch for it and the clamp-on lamp for my desk, fumbling about for several seconds to locate them.

Not a big deal, but I headed out to Ikea and bought a new swing-arm light (under $10!), traded the cute lampshade lamp for something less floppy (from another part of my house) and also bought a power strip that I stuck on the desk.

Now I just flip one switch and all three lights light up my desk like a summer day!

You'll also notice that the clutter is off my desk, thanks to the in/out trays I bought and painted. Anything that is in-process or that I haven't quite decided what to do with gets stuck in my trays. Whenever I have some spare time and no particular project to work on, I go through the papers in my trays and put them away where they belong.

So that's the update so far! More to come -- just two weeks left of the challenge to go!

Tuesday, June 23, 2009

Glass Storage Containers


With a budget of only $100, I've been trying to be creative for the Crafty Space Makeover Challenge.

For the most part, it's been fun just looking around and reusing things that I otherwise would have overlooked (and I've had some great luck browsing thrift stores -- the fun thing about thrifting is that you can go back a week later and continue to find new stuff all the time).

I've been able to find a ton of great glass container (apothecary cars, fish bowl, candy jars, mason jars), perfect for storing small craft supplies. You can see them above. I'm a sucker for glass -- everything looks so pretty in them. Also, they're good for my style of organization because it helps me to be able to see everything (if something's stored in a tin, I probably wouldn't think to use whatever's inside).

A lot of the jars came originally from Goodwill -- I bought a bunch to use as moss terrariums and also as stick bug habitats to find homes for the boys' little critters. They're generally between $2 and $4 or so.

Just going through my house, I've found lots of other great containers, far more than I need. If had a great many, say, embellishments, I think a whole line of mason jars lined up across a shelf would be a lovely way to display them.

I'm about halfway through the four weeks I allotted myself for this challenge. Still a lot left to do, but I'm already seeing so many improvements!

Sunday, June 21, 2009

More Crafty Space Makeover Updates!


Take a look at Elana (Life in Sunset)'s fantastic Crafty Space Makeover!

Tons of wonderful photos to show her creative use of inexpensive containers:


For myself: things are going great! I have had a setback in repainting the bookcases that I purchased cheap, but I'm convinced that I'll be able to do a lot of work on them today.

Reorganizing is one of those things that is a little viral. Sometimes when you set out to just tidy up your desk, it becomes an entire makeover and then you infect others and suddenly there's a whole group of you working at it at the same time. For me, it's even spread from my little upstairs corner nook to get me to totally rearrange the living space area and dejunk that area as well!

I'm not done, by any means, but I have to gloat just a little here: it is SUCH a wonderful feeling to have a nice clear open desk that I can sit at and craft if I have a few spare minutes. Sometimes I just like to sit there even if I have nothing in particular to do.

I love knowing where all of my tools and supplies are (although I'm still shifting them around a little bit). I love that I've tossed away years worth of junk that were just taking up very useful space (I found two huge boxes of VHS tapes with old Seinfeld recordings, among other things -- they are now gone!).

All of these useless items were like tiny little weights on my soul: each one unnoticeable, but the combined weight of all of them really did wear me down, even though I hadn't realized the effect it had on me.

I really feel lighter and happier just inhabiting my transforming space.


Okay, enough on this metaphysical nonsense! Here are some cute ideas I found online that I found inspiring:


Saturday, June 20, 2009

Customer Spotlight: Love from Singapore


As I've blogged before, I'm a member of the EtsyGreetingsTeam, which is a group of cardmakers who sell on etsy. Among other things, we have a very active discussion board in which we discuss marketing tips, success stories, favored vendors and everything else under the sun.

In the past people have brought up the topic of "Nicolette from Singapore" who had tapped several members and made several wholesale purchases from various teammates. She seemed like a very glamorous and mysterious figure.

Naturally, I was totally thrilled when Nicolette contacted me with a request for a variety of cards -- I felt like I was suddenly part of a very elite club.

After she had given me some very nice feedback, I felt like I had to ask her about where she sold the cards. I knew that she sold them in some sort of flea market, but I wanted to know more. I was pleased to get a response from her in just hours! This is what she told me:

I've participated in about 5 fleas so far, the latest was the most successful!! I only have pictures from 2 of the fleas though, my card reader is spoilt and I've got to grab a new one!!!

For all the fleas, it's always been first-come-first-serve, so my partner & I would DRAG ourselves up really early in the morning just so we can grab a good spot later in the day!!! It's REALLY tiring!

I play with a limited number of things as 'props' for the cards. Due to the LACK OF SPACE (most often, I get a 3m by 3m area, if I'm LUCKY!), I can't afford to display the cards exactly the way I want them! Which really sucks actually :( I've also combed Ikea a thousand and one times looking for cases that can hold and yet showcase the cards well but to no avail :( My partner then put together the yellow thing you see in the pictures! Haha, yes it was made from scratch! Acrylic holders are SO EXPENSIVE!! (Btw, I would LOVE any ideas any awesome etsyians can give me about displaying my items!!!)

Anyhow! I'll talk about the latest flea since I brought most of the stuff along with me to that flea! As I said, that was THE most successful flea ever! We had a corner booth with lots of space at the side, so we laid down red cloth (EYECATCHING!) and laid cards & tags & notecards... you get the drift! on the cloth. People REALLY stopped to look! That was on top of the usual display I'd do on the table! At one time, there could be up to 10 people crowding around my small area! Which I had some photos! I'll definitely update you with them!

People were really intrigued and interested in the items. More often than not though, they walk away empty-handed unless they really have an occasion to buy for! Do you encounter this too? I guess it's the recession or something :(

I put 2 of your cards on my yellow stand at the latest flea and I think I demonstrated at least 10 times how those work!! Haha.

I've another HUGE flea coming up next weekend. That's going to be huge as there are about 200+ vendors! Plus it's coined the biggest flea in Singapore so the turnout should be awesome. Will let you know how that goes!!!

Please do relate all this to the etsygreetings team!! I know many people have asked me but I have been SOOOO busy since June started!!! I had to rush to get the items prepared for the flea once my aunt landed and I have been SWAMPED! This month alone, I've had 2 fleas so far and 1 more coming up! Please relate my apologies as well!

Fleas are REALLY tiring, but really worthwhile at the same time. I feel like with each flea I'm 'educating' my peers (most are teenagers / young adults like me!) and stuff. I feel like I'm bringing them loads of cool stuff! Haha! I've been told a thousand times how awesome and wonderful the cards and stuff are!!

Also, please help me let everyone know (I guess you guys have a forum or something? Haha!) that everyone who has worked with me is making my dream come true! So I'm really thankful and blessed :)

I hope this answers all of your questions! Let me know if there's anything I missed out on! :)

Love,

Nicolette

So there you have it. The mystery of "the girl from Singapore" unravelled!

I'll post any additional pictures that she sends me after she gets her card reader working again (she says that in the new photos we'll be able to see some of my cards -- yay!).

In the meantime, if anyone has any wonderful tips to share with her (like ideas on how to display her wares at the shows), convo her at etsy, she is forneverlove. (I asked her specifically if she would mind if I posted her "etsy handle" and it sounds like she would love to hear from you!)

Friday, June 19, 2009

My Crafty Space Makeover Participant Updates


I'm giving out gold stars for the progress that my Crafty Space Makeover teammates have done on their crafty spaces already!

Shannon, of April Ink, posts this update to her "Monica Room:"


And two updates from Danielle, from Collective Elements:


Genelle, of Scrapbook Completed, has really been doing her homework, to do her makeover right:


I love the little snippets of that book that she's been looking at ("The Organized & Inspired Scrapbooker"). I'm not a scrapbooker, but it looks like it has a ton of great ideas.

And, last but certainly not least, here's a thrift store find by Pinky Creations: http://pinkycreations-pink.blogspot.com/2009/06/im-still-scared-i-have-not-had-lot-of.html

You're all doing GREAT!

(if I missed your update, please drop me a comment and I'll fix that)

I had the day off today, so I have been happily working away, cutting through my clutter. Once I have a critical mass of similar "stuff" that I need to keep, I have found that it's very helpful to designate a bin for it (it can just be a cardboard box, temporarily). For instance, I kept on running across cards that I was testing out or samples of cards that I had created for customers while we were working things out. Once I designated a bin the "Sample" bin, it became a great tool to eliminating a ton of clutter really quickly.

So here's my cheesy adage that I made up: "When you have a place for everything, everything falls into place."

Organizing all my Card Parts


I am super excited about my new card-in-progress storage system!

Way back in the past, I was completely unorganized about my card pieces. I would print and cut out pieces as I needed them. If there were extra bits, they would float around in various boxes or on my desk until they got incorporated into a card or until they got damaged and would have to be tossed.

Eventually, I wised up and started storing the bits and pieces in file folders that I stored into these plastic craft storage containers that I liked from Freddy's for about $6.50 a shot. I got a second when I overflowed the first one. Then I started to overflow that one as well and was considering getting a third when I did the math and realized that I could probably pick up a second-hand filing cabinet for about $30 or so that would work a ton better than a bunch of plastic cases.

So I started the hunt, looking in various thrift stores, checking out possible alternatives to store these folders.

When thrifting, it's best to not get too focused on a particular item that you're looking for. Instead, keep in mind the problem you are trying to solve. You might be looking for a good pencil holder and spend all your time in the desk organization area completely miss the wonderful glass vase that is the perfect size and shape to hold your pens and pencils.

What I found was a picnic basket for $6 that looked like it could hold my file folders perfectly.

I took my treasure home, totally thrilled with this inexpensive and completely cute filing cabinet alternative. Check out the red gingham print!

Once home, though, I was disappointed with how my file folders flopped listlessly on their sides in the basket and I realized that I really needed a file frame that would allow me to organize my folders into hanging file folders.

They sell them at the office supply stores for $10 to $15 (they include some hanging folders, but I didn't need them, plus they often come in sets of two) but I remembered seeing them at a thrift store recently. I hadn't needed them at the time, so I hadn't gotten them and I had to revisit two Goodwills before I tracked them down again.

$4 more. My husband set me up with a hacksaw with which I cut off the excess length and now they fit BEAUTIFULLY.

I found an old nightstand to set them on, so they're at a perfect height next to my desk -- otherwise, if they're on the floor, like under the desk, they're harder to get at and not in a well-lit area -- and they are VERY convenient now.

If I want to do a card, all I have to do is pull out the correct folder, toss it into my portable crafting kit, take it anywhere I wish and I can be completing a card in just minutes (instead of hunting around my cluttered desk looking for pieces of card or my tools).

Joy!

My damage for my filing system: $10! And WAY cuter than a sterile old filing cabinet!


Thursday, June 18, 2009

My latest thrift store score!

I found these colorful drawers at Goodwill yesterday.

$20! They retail for $70 and they're in great shape!

I am very happily moving many of my smaller tools and supplies into it that I don't use very often...

Tuesday, June 16, 2009

Don't Just Organize: STAY Organized!

I'm not just trying to get organized with my Crafty Space Makeover Challenge.

I'm trying to figure out a system that works for me so that I can STAY organized.

I don't want to do an entire crafty makeover every few years, where I spend weeks reorganizing my space and vow to keep it tidy again. I want to create a way of organizing that will STICK. All too often, I'll spend a great deal of time cleaning up a room and feeling pretty darned good about myself for about three weeks until the room begins to fall back into its normal state again.

Not this time.

This time, I'm really thinking hard about how I work and the types of storage that works for me.

For me, putting things in boxes with lids on them will prevent me from using them. This is not the place to store items that I use very frequently. Those items, if they have any hope of being put away regularly, need to be stored in very easy reach in a highly visible spot. And all my tools and supplies need to have a very clearly defined "home" or they'll end up creating puddles of clutter here and there.

This is not to say that I can't have cute storage boxes with lids -- the items stored there just have to be things that I don't use all the time or they have to be items that I am willing to go and get if I need them.


I am not naturally a tidy person, so any system that works for me will have to be extremely simple and almost effortless.

I was surfing around the web for some tips and came across this article. These great tips really ring true to me and are things that have been simmering in my brain for some time now:


Great stuff!

A sampling: Give everything a parking spot, Assume laziness is the norm, Batch up your tasks... all these are things that I've pretty much concluded on my own during this experiment, but it's really nice to have my ideas validated like this.

Enjoy!

Hope you enjoy!

Hello Cupcake, Hello Desk!


Stacy, of Hello Cupcake has a very tiny crafting space to work with. She's completed her own Crafty Space Makeover Challenge and posted before and after shots on her blog.

(after reading about her space makeover, check out some of her other posts, especially the one just before this one about the clever invitations she did for her boyfriend's medical school graduation party -- super cute and clever!)


Monday, June 15, 2009

Free Printable Bookplates!


Taking a break from Crafty Space Cleaning to bring you these adorable (and FREE!) printable bookplates from Orange You Lucky!

Amazing illustrator! And so nice of her to share...

Find all three super cute designs on this blog posting:

Crafty Space Makeover Budget Recap

So I started my Crafty Space Makeover Challenge a little more than a week ago with a target budget of $100.

Frankly, I don't know if I'm going to make it or not. But I'll try!

This is the damage so far:

Bookcase $10
Wooden Tray $4
In/Out Trays $8
Spray Paint $17 (so far)
Candy Dish $3
Picnic Basket $6
Cutting Mat
(for portable craft kit) $6
Adhesive strips
(to stick up my corkboard $3
Magazine Holder $3

Total (so far) $60

Not too bad...

I'm so pleased that many of my "improvements" have cost me very little (or nothing when I can reuse something that I already have).

Surprises? The cost for spray paint really adds up quickly! It's only about $3.50 a can, but it does get used up. I used just about an entire can just doing my in/out trays and portable crafting kit tray, so I have to factor in that amount when I'm weighing the cost of buying something and refurbishing it vs. the price of buying something ready to go as is.

Honestly, though, I don't shop at Goodwill just because I'm super cheap (although this is certainly true). I also shop there because I feel like I can pick up unique items with more character (though with perhaps a little bit of work) than I can from a place that mass produces them.

I still have a few more challenges to handle for this makeover that will probably need some purchases (like how to deal with my files, but I have a couple of ideas....) but I'm really happy with the results so far!

Sunday, June 14, 2009

Bookcase Find!

I have been completely HAUNTING the various nearby Goodwills for the past week, looking for things I can use for my Crafty Space Makeover.

Near my desk is a bookcase that I don't particularly like using (it's being repurposed from the boys' playroom and doesn't quite work for me). I've been thinking about possibly buying a bookcase from Ikea. For only $32, I can get an inexpensive bookcase with white laminate. It would work fine.

Then I scored at a new Goodwill I'd never been to before. I purchased the above bookcase for the incredible price of $10!

I'm super psyched!

I've been eyeing this lovely shade of squashy yellow that would harmonize delightfully with my apple green. I think this bookcase will look ADORABLE in a pretty color...

With a little bit of work, I'll have a bookcase that would be FAR cuter than the sterile white one I'd been eyeing at Ikea, and for far less.

I'll keep you posted!

Welcome, Pinky Creations!

Pinky Creations is going GANGBUSTERS!

She just started the challenge on Friday (one of her "before" shots is shown, above) and she's already made a lot of progress and posted two blog entries since.

Here's the original post, with lots of great photos:


Check out her blog and leave her a word of encouragement -- I'm so amazed at what she's done already!

Saturday, June 13, 2009

My Shipping and Mailing Kit


I love my envelope bins and I love that they are in something cuter than the ripped up cardboard boxes that they were in, but guess what?

By using my cute bins for all my envelopes, I had inadvertently made things a little harder for me.

I realized this when I was getting a few orders together to ship out the other day.

Normally, I grab the envelopes I need from the boxes sitting on top of a table. It's not very attractive, but it's super easy to get them.

This time, I had to crawl under my desk, open up the right drawer and then rummage through it to find the ones I needed.

Okay, not a huge hardship, but a small step backward in terms of productivity.

I then started thinking of all the other steps I normally go through when I fulfill an order.

Assuming that the card is already made, I grab the card, then walk over to find a matching envelope. Then I go through my folder of plastic sleeves and pick the right one. I put the card and envelope inside, slipping in a little printed "thank you" before sealing up the sleeve.

I walk across the room for a piece of chipboard, walk back to my papercutter and cut it to fit. Walk over to find a mailing envelope the right size and slip everything inside.

Then I weigh the package on a postage scale near my desk and place the right amount of postage on it by consulting a sheet I printed off the U.S.P.S. site.

A lot of walking around for such a simple task.

I realized that it would be simple to put all the supplies I needed for this task into one place, one handy kit.

I listed out everything I needed. Here's what I came up with:
  • Card envelopes in the two common sizes I use for my greeting cards
  • Outer envelopes, two sizes
  • Chipboard
  • Plastic sleeves, two sizes
  • Printed thank you slips
  • Stamps
  • Printouts of the costs to mail envelopes
I found a really nice basket that was unused in our basement (if you're starting to think that our basement is completely overflowing with unused organizational supplies... well, you're not totally far off).

So, this is all the stuff that went into the basket:


And, at the top of this posting, a photo of my completed shipping and mailing kit! The clipboard keeps my postage information sheets handy and tidy (or I might just laminate them).

Maybe I don't get out often enough, but I'm pretty jazzed about this little basket that should make things even easier for me to do what I need to do!

Welcome Danielle, of Collective Elements


Welcome aboard, Danielle!

She's posted a whole bunch of before pictures on her blog. Check them out!

Danielle dabbles in a lot of different kinds of crafts, so she has a lot of different supplies to have to store. She reports that sometimes it's so difficult to find things in the clutter that sometimes she simply rebuys things.

I can relate to that!

Glad to have you with us, Danielle!

Friday, June 12, 2009

Lavender Greetings Update


An update from Lavender Greetings shows the REST of her mess! Lots of photos show how her craft "area" extends throughout her house -- kitchen counter, dining room, etc.

She is also committed to sticking to a $50 budget. Good for her!

I don't think I can do what I want to do for less than $100, so that is the budget for my own makeover.

I'm also going to commit to being done by July 7. I'll post the "after" pictures then!

Update on the Portable Crafting Kit

Just an update on the Portable Crafting Kit/Tray idea I mentioned earlier: it's working GREAT!


The idea with the tray is that it will be the permanent home for those tools that I am always carting up and downstairs (when I want to craft in the dining room, which is brighter and closer to the family): exacto knife, ATG gun (LOVE this adhesive gun!), bone, brads, cheap reading glasses.

Since I'm really focused on making cards lately, making a tray to accomodate this obsession is easy. Some of you, who do more than one kind of craft (if you were to want to try this out) may find that you need more than one kit to accomodate different kinds of projects.

The other night, I decided to make some of my Three Reasons Why You're Wonderful (Cute Bunny in a Boat) cards while my husband was finishing up on dinner.

I try to stay ahead on all my cards by printing and cutting up the pieces and storing them in file folders, so I was able to grab the folder for these particular cards, toss it into my tray and haul everything I needed downstairs without having to do a lot of frustrating hunting.


With all my tools on hand, it was easy to put together three finished cards in just minutes!

The only improvement I can think of is that I had to run up and grab the big self-healing cutting mat from my desk as I had to do some cutting on some of my pieces. The cutting mat is huge and awkward, so I'm going to buy a small cutting mat that will always be stored in my crafting tray.

I'm really excited about this new efficient way of working!

I'm trying to think of other tasks that I am always doing and creating "kits" around them as well. Next up: my shipping and mailing kit!

If you have any ideas of your own to share, please leave a comment!

Thursday, June 11, 2009

Life in Sunset Joins Us!


It's another Crafty Space Challenge participant! It's Elana from SqueezeCard. Check out her assessment of the challenge ahead of her in her blog.

Welcome!

It looks like Elana's got a bunch of sorting and dejunking to do, but check out some of the cute storage that she has already! It'll be exciting to see what she pulls together!

My Progress So Far on the Crafty Space Makeover Challenge

Okay, the top big image shows the original crafty nook, as it was last week, before I started this adventure.

The smaller images underneath show my small amount of progress so far.

I've swapped the black table that I had before (that was too small to accomodate my papercutter) with our big computer desk, which works great! It gives me a ton more surface to work with!

More Shelf Space

I found an unused little bookshelf from the boys' playroom to nudge into the corner to hold additional supplies. This works okay. That piece is more decorative than functional and I actually promised it for someone's child's room, so it's only there temporarily.

I'm eyeing some bookshelves at Ikea that would fit there nicely and be much more functional (I know, I'm trying to recycle and thrift as much as possible, but no good shelving units have come up in my searches so far. I'll keep trying! Ikea is a fallback position -- they're only $32!).

My Progress so Far

So, more on the progress. The tray for my portable crafting kit is working out GREAT (I'll blog about that soon). As you can see, that pretty green tray has found a very handy place on the baker's rack where it is always available for a quick crafting session.

In the middle image, my new in/out trays have successfully contained a ton of extra paper that I have yet to process, leaving the desk free from clutter and completely usable. Yay!

In the right-most photo, you can see the envelope drawers that I blogged about earlier, sitting under my desk.

That's the good stuff.

Lots of Room for Improvement Still!

What's not working for me: the corkboard tiles I put up behind the desk (where I thought I'd hang pretty paper and inspirational clippings) keep falling down, which is super annoying. I'll find some good sticky adhesive to really get them stuck to the wall once and for all. Or I'll have to take them down.

Clearly I have to tidy up my baker's rack. The rack is.... okay, but the spaces between the shelves is too huge, so I have a lot of unused space, not very efficient. I'm thinking about how to make this better.

That big black Adidas paper bag that sits on the floor is for my recycling. Very functional, but oh-so-ugly. Clearly I need a more attractive repository for paper scraps, preferably one that will catch the cuttings from the paper cutter.

The lighting, with one table lamp and one swing-arm lamp, is not bad, but could be better. I like a really bright work area, so I'll be looking for inexpensive lighting in thrift stores.

So, moving right along, though! I know it's not a ton, but I feel like I'm really making some progress!

Envelopes

So, this is actually my second crafty space makeover. The first time, I overhauled my stray envelopes, pulling them out of stray places all over the house and sorting and consolidating them into three cardboard boxes.

This was a pretty good step for me, but I thought I could go one better this time.

I found a whole bunch of these white plastic drawers in our basement. We used to store baby clothes in them. A good wash and they were as good as new and really a ton spiffier than the ripped up cardboard boxes I had my envelopes stored in previously.

The labels I made tie in my two colors: apple green and bright blue.

These drawers will live under my big desk, keeping all my envelopes within easy reach...

Wednesday, June 10, 2009

Apple green and bright blue color combo


I started using apple green for my craft corner, mostly because it was the prettiest color in the spray paint aisle when I picked out a color to make my in/out boxes and tray, but I hadn't thought much about how to carry the color theme forward.

I came across this interesting color combination.

I think it's lovely and a combo that I never would have dared on my own.

I want it!

Anyway, I've started thinking of using these colors for various things, but here's the thing: I don't want to get so caught up in making things look pretty that it starts to get precious. That is, I don't want the cute factor to become a barrier in my being able to make things.

Here's a for instance: maybe I find a ton of incredible little adorable drawers with just the right colors for the right price. They would fit some papercrafting supplies beautifully. Should I get them?

For me, absolutely not. If I tucked supplies away into drawers, no matter how adorable, I would never use them again. Once I can't see them any more, I won't think to use them (out of sight, out of mind is an adage that really fits me). So in this instance super wonderful cute but not a good fit with my crafting style.

Two New Challenge Participants!

We are on FIRE! I'm welcoming two new participants to this challenge:

AprilInk (who describes her personality as being like Coutney Cox's on Friends: "a little intense, a little uptight, liked order and needed to have everything around her organized and in its place") who makes a confession about her "Monica Room."


Lavender Greetings, who actually started a blog just so that she could participate in this challenge! I am showing the photo to her crafty corner, above.

Welcome aboard!

I hope to be able to post some photos of everybody's progress and links back to their blogs as we work on this challenge together.

If you have some fun crafty organization tips or would like to participate in this challenge, leave a comment!

My own personal challenge is for four weeks, so I am planning to be done by July and I am hoping to reorganze my entire crafting nook.

You can shape your own challenge however you would like -- it can be big or small you can set up your own deadlines. Just let me know so that we can all root each other on to crafty perfection!

Tuesday, June 9, 2009

Finished tray: my portable crafting kit (and more Molly crafting space philosophy)

Here's my finished tray! After spray painting it and allowing this Goodwill treasure to dry thoroughly, I remembered a stack of old corkboard that was moldering in our basement (it used to hang in the boys' room).

A little measuring and some swipes with an exacto knife to cut it to fit it into the tray and voila! I have a super functional tray bottom (that incidentally, hides some uneven spots of the paint job).

I think it looks totally gorgeous...

Why the tray?

Now then. You might be wondering why the heck I rescued a wooden tray and what that has to do with craft organization.

It's because I've been thinking very hard on what I do when I craft. This is probably a very good exercise for anyone who is thinking of making over a workspace. Think of the motions you make over and over and then think of ways to make things easier and more efficient.

I realized early on that while I love having a dedicated craft nook, when I'm working on something that will take me a while to complete (like, say, 150 wedding invitations), I really prefer hauling all my stuff downstairs and working in the relatively bright and airy dining room. I'm also closer to the family and don't feel all sequestered away.

I found myself packing all my supplies into a box lid (exacto knife, bone, card parts, brads, etc) and going back and forth with this kind of makeshift kit.

Portable Craft Kit

Thus was born the idea of a portable craft kit and, therefore the need for a tray (and a super adorable tray at that!).

So the idea is that there will be a certain set of tools that will always live in the tray. Current projects will go into the tray as well, making it easy to pick everything up so that I can work wherever I choose.

Organization can solve a problem

Think about how you work and try to keep this in mind as you are reorganizing your space. What makes it easy for you to craft? What gets in your way? What are the tools you use ALL the time (and therefore should be very easy to access?)

My tray, which will hold my frequently-used tools, will have a home on a nearby shelf where it will always be easy to grab and go.

A place for everything and everything in its place

Oh, and that's another big tenet of the Molly Lee Crafty Makeover plan: everything has to have a home. Without exception. Otherwise, you end up with little bits and bobs that just float around and make clutter and the next time you turn around, they've multiplied and everything's a huge mess.

That's one of the reasons why I got the in/out boxes that same day I scored on the tray at Goodwill. I discovered that there were always stray pieces of paper that ended up on my desk that I didn't quite know what to do with. They might be extra pieces of something that I hadn't quite gotten around to putting away or something that I just wanted to take a better look at at a later time. In any case, they added to the mess on the desk. The in/out trays will give these scraps a home until I can put them away someplace more permanent.

Find clusters

So, take a look around your area and see what has accumulated. Most times, you'll see major groupings of things. Throw them all into a box or basket (it's "home" for now) -- it doesn't have to be anything pretty, just start putting like objects together. Only after you get a handle on how big your various categories are will you be able to find the proper storage for them.

Declutter

Be ruthless about throwing away anything you don't think you'll ever use again. Think of your limited space as what it is: a precious, very limited commodity. Is that spool of ribbon worth the amount of space you'd have to give up to house it? Get rid of it if not! Decluttering is VERY good for the soul!

Give yourself an "I don't know" bin

One tip: while I think it's very important to find a home for all your supplies, also give yourself one "out" to toss things that you know will accumulate, like my in/out trays.

One year, I organized the boys' toys into bins that I labelled (the boys went on a big week-long fishing trip and I went to Ikea three times -- yay!). This was a great thing to do, but one major factor for the continuing success of the toy/bin system was the addition of one large basket that we call the "I don't know basket." This is where we stick things that don't belong anywhere else. If we didn't have this extra bin, we'd spend way too much time trying force some things into places where they don't really belong. It helps us get through cleanup super quickly.

So declutter and organize your supplies into logical groupings, but do allow yourself the luxury of having one "I don't know" bin.

Here's an update from Happy Elephant, remember her? She took a whole ton of close up shots of her storage ideas. I really like how she's reusing things that she already had.

If you're embarking on your own Crafty Space Makeover Challenge, let me know and I'll link back to your blog (if you don't have one, we can make arrangements to post the photos to this blog).

Don't think you have to do anything big. If all you do is sort through all your envelopes and store them in a plastic bin, that's something. I welcome makeovers large and small! Sometimes little things make a huge difference!

Monday, June 8, 2009

Jessica's Closet o' Doom

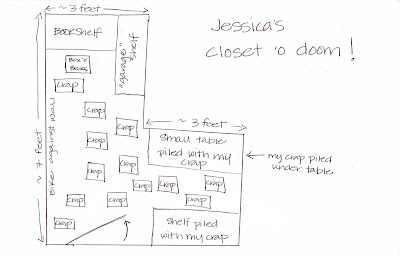
Here's a new participant to my Crafty Space Makeover Challenge! Meet Jessica Eiden Smedley of the Have We Met? blog.

Apparently her space is sooo horrific that she cannot bring herself to post an actual before shot of how it's organized, so she made a sketch to show us how it looks.


Some notes about her own challenge: she doesn't actually have a dedicated crafting table at which she works. Rather, she has some space in her front closet (ostensibly, she shares with long-suffering Matt, but his stuff seems to be getting pushed out into the fringes) in which she stores all her stuff (note multiple piles of crap in the sketch). 

When she crafts, she hauls the stuff that she needs out and works at the dining room table, which is then taken over by whatever project she happens to be working on til she is done with it.

Jessica also realizes that her current living space is temporary -- they're in an apartment now and may be moving in the near future -- so any solutions we come up with should be portable and easily translated to the new place (or so simple and cheap that we wouldn't feel bad about abandoning it and starting again later on).

So, here are some ideas that I would consider if I were Jessica (and I realize that I'm not, so if she doesn't take these ideas, it's totally okay):
  • Move everything out. Sort through all the supplies and put like supplies with each other (bins, cardboard boxes, whatever will hold them and get them off the piles that they're currently in). Be absolutely ruthless in throwing away things that you will not be using. Take them to Goodwill, get a receipt for your taxes and feel good that you're doing a good thing for the environment by recycling and for the charities that Goodwill supports.
  • Make better use of vertical space by putting in inexpensive shelving. Since Jessica isn't planning on working in the closet, this would be the best use of the space. I know that you can get some fairly inexpensive shelving units at Freddy's for something like $30. Yes, I know we don't want to spend a lot of money, but I think these things are cheap bang for the buck and they can easily be moved to a new home, whenever you decide to move. If you can't use them in your new crafty nook, then you can put them to use in the garage or laundry room. This should give you storage space to get everything off the floor.
  • Preferably, if you can, everything would be logically sorted into bins and boxes.
  • Now, I'm making some assumptions about how Jessica works, but I am thinking that if she can make enough space in her closet to fit a rolling cart like this one:

    Don't you think that would work? Depending upon the craft project that she wants to work on, she can grab the bins that she needs, her sewing machine, if she needs it, and wheel it out to the dining room table. She can keep much of her supplies, close at hand, on the cart and work at the table. This will allow her to keep her supplies out and not take over the entire table until her project is completed. (that cart, btw, is available at Target for about $40)

Here's another thought: pegboard!

A number of crafters have used this very versatile, inexpensize garage staple to their advantage. Check out these links:

http://stampinat6213.blogspot.com/2007/08/pegboard-organization.html  (check out iStamp's RIBBON storage, which made me think of Jessica's wire hanger)


And one more completely unsolicited bit of advice (hope Jessica's okay with all of this!). I found this blog posting for someone with a nice bit of ribbon storage advice (it involves some woodwork, but you might be able to swing something). Check this out:

A great ribbon storage idea from Scrapmaster's Paradise's blog.

Okay, those are just my thoughts.

Anyone else have any ideas and tips for Jessica?

Crafty Space Makeover Challenge!

Here's one of the "before" photos for ScrapbookCompleted, who's joining me on this Crafty Space Makeover Challenge!


AprilInk has also committed to this challenge. I'll post a link to her blog after she's had a chance to take some "before" shots. Both of these crafters come to us from the etsygreetings team.

Welcome aboard!

I love the idea of having some support and camaraderie along the way -- please let me know if you're interested in participating as well. I'd love to have you on board! If you'd like to do this, take a before shot of your crafty nook and let me know about it. I'll post a link to your blog from mine and we can try to root each other on to crafty space perfection.

A note about my own ideas with my own makeover: I love the idea of reusing things that I already have. I can get a lot farther on crafty space perfection if I can find inexpensive ways to do things. I was surprised this weekend by how many things I already owned that I could put to excellent use: 
  • I had some great plastic bins that used to hold the boys' baby clothes that I washed out and used to store my envelopes in (nicer than the cardboard boxes they were in before)
  • I already owned a number of pretty glass jars from Goodwill (purchased when I was making moss terrariums right and left) that are great for storing supplies. 
  • I really needed a bigger crafting desk because my current one wasn't big enough to fit the big papercutter I'd purchased. I actually went to Ikea to try to find one that I liked, but then my husband suggested that we could swap the craft desk with our computer desk, which is bigger. This worked GREAT!
  • I have an underused laminator that I used to make some cute labels for some of my supplies.
Not all my needs can be met with existing finds, but you get the idea: I don't want to have to spend a ton of money or buy a lot of new stuff to put into our already crowded house to do this. I also am emphasizing functionality over cuteness. 

While I really would love to have a perfectly tied-together, cute craft space, the bottom line is that all my tools and supplies have to be stored in such a way that makes it super easy for me to create. For me, I know that if I something is tucked away out of sight, I'm unlikely to ever use it. I'm really visual and have to be able to see everything, so open shelves and clear glass or plastic containers are really going to be key to my success.

This is just me, though: everybody has a different way of doing things and a different solution to the craft organization dilemma. The key is to figure out how you work and try to tailor your space to that.

Happy Elephant, who started this whole thing by making over her own craft space, sent me these tips that worked for her:

  1. Those little nuts and bolts draws are perfect to organize your embellishments.  And the drawers can be labled so you know what's in it at a glance. 
  2. An old filing cabinet is great to store your smaller 8 X 10 cardstock.  I have mine catalogued in folders of matching colors according to the rainbow.  For my bigger papers I use those standing folders you put together (I got mine at Oriental trading for cheap) and that sits right on top of my desk.  I also organize those in rainbow hue, and try to keep like companies together since they tend to match. 
  3. I stamped all my stamps in a notebook so that I could then put them away.  Now all I have to do is grab the notebook and leaf through to see which ones I want to use. 
  4. I put my buttons in a container I had when I was a little girl and loved to make those silly braided friendship bracelets (it used to hold all the thread needed to make those).  Now it holds all my buttons, which are color coded. 
Do you have some organizational tips? Let me know! 

Sunday, June 7, 2009

Goodwill + spray paint = :o)


All jazzed up with the idea of sprucing up my craft nook, I headed out to Goodwill in search of good reusable organizational items. Here's what I found:


There are a couple of nice solid wood in/out boxes, a wooden tray and what looks like a sweet little candy dish that I thought could be helpful in sorting out brads.

They were nicely made and oh-so-cheap, but the dark heavy wood reminded me of portly turn-of-the-century stockbrokers, hardly a fun, creative image.

A quick trip to Freddy's scored me a can of beautifully-colored apple green spray paint.

A little prep work (cleaning, sanding, etc) and several coats of spray paint later and I had some really kick ass matching desk accessories!


Saturday, June 6, 2009

The Crafty Nook


A while back, I invited my friend Linda over to show her some of my papercrafts. At one point, she expressed excitement about "seeing my studio." I laughed and explained that I didn't have a "studio" so much as a bunch of piles of paper and some boxes and totes filled with things.

As I became more involved in etsy, this arrangement became more and more cumbersome: every time I wanted to sit down and make a card, I'd have to clear out space on the dining room table, haul all my supplies out and then clear it off before the next meal.

My husband carved out a little nook for me by setting a leftover table/desk in a corner and I happily moved in.

You can see the baker's rack that I purchased when I thought I was going to be participating in Crafty Wonderland for May (I got WAITLISTED!).

So this new arrangement has been a huge improvement, but I'm now ready for a new makeover. I had purchased a new papercutter (a rototrim, on advice of my husband -- it is NICE), but I went for a nice, big size and it no longer fits on the desk, hanging over the edge. Bummer.

A fellow etsygreetings member recently posted some information about her own craft nook makeover. It's so inspiring to see how other people do it.
As you can see, the internet is chock-full of ideas from bloggers sharing their studio makeovers. I'm going to add another to the teeming crowd. This month, I'm challenging myself to get my act together and create some organizational ideas that work for me. My goals are to find my beautiful rototrim a spot that it can actually fit, organize and store all my various tools in easy-to-reach places and make everything look bright and cheery and inspiring. I also don't want to break the bank in doing this, so I'm looking for inexpensive solutions.

Wish me luck! I'll post photos of the results hopefully next month!

Wednesday, June 3, 2009

Customer Spotlight: Calyra's Princess Party

When Nancy started looking for party invitations for her daughter's birthday, she found that she really liked the Circus invitations in my shop, but, of course, acrobatic monkeys had little to do with the princess theme that Calyra had her heart set on.

She contacted me and we talked about a custom Princess-themed birthday party invitation with the same interactivity as the Circus cards.

A quick search for some pretty artwork later resulted in a castle invitation with princess-type icons appearing in the windows. Nancy was thrilled with the custom Princess  invitations (and I got something fun to post to my store afterward)

Nancy's party was at a castle that specialized in making children's birthday party dreams come true. Click on the photos above to enlarge them. Isn't that table picture-perfect?

Some of the activities for the day included dress-up, storytime and stuffing a special pet.

In addition to the invitations that she ordered, Nancy also asked for coordinating gift tags, which she put on her Disney princess-themed lunch boxes (which were stuffed with a treasure trove of royal gifts).

Nancy was happy with the invitations, telling me this: "Thank you again for your patience and quick turnaround on the invitations, favor tags and thank you cards!  They all came out perfect and my guests loved them!"

Nancy, thank YOU for being a perfect customer and sharing your story with my readers!